How To Screen Record On Chromebook With Audio? [Step by Step]
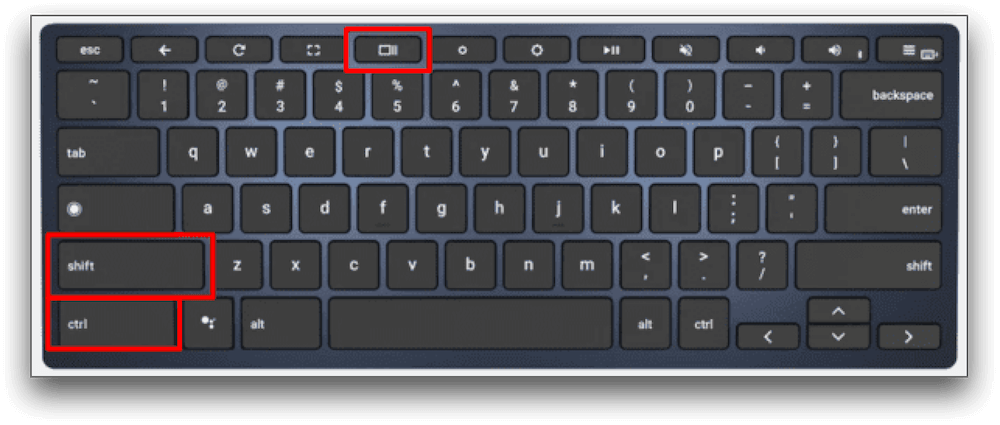
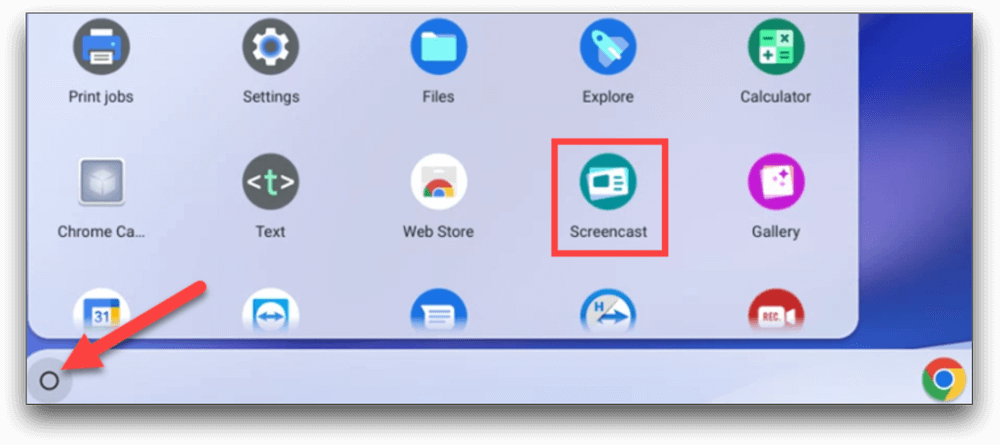
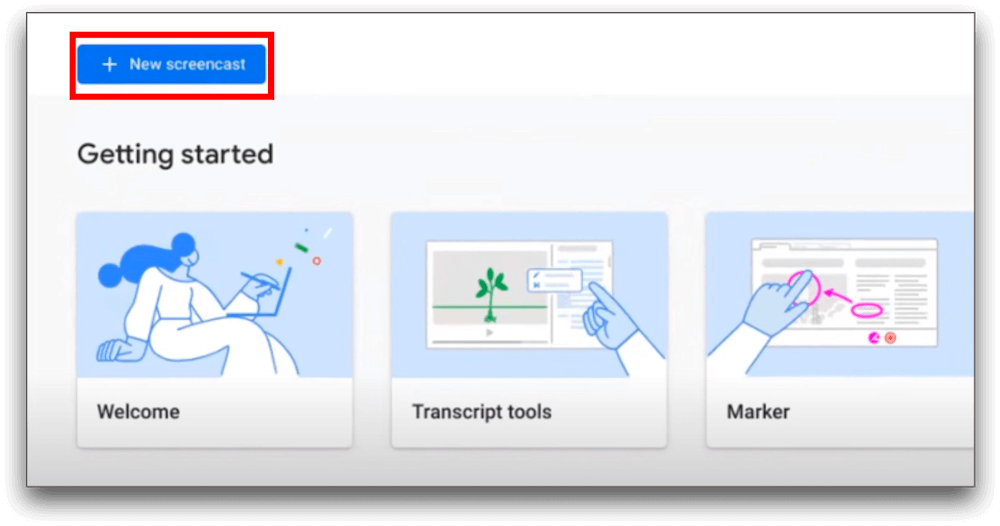
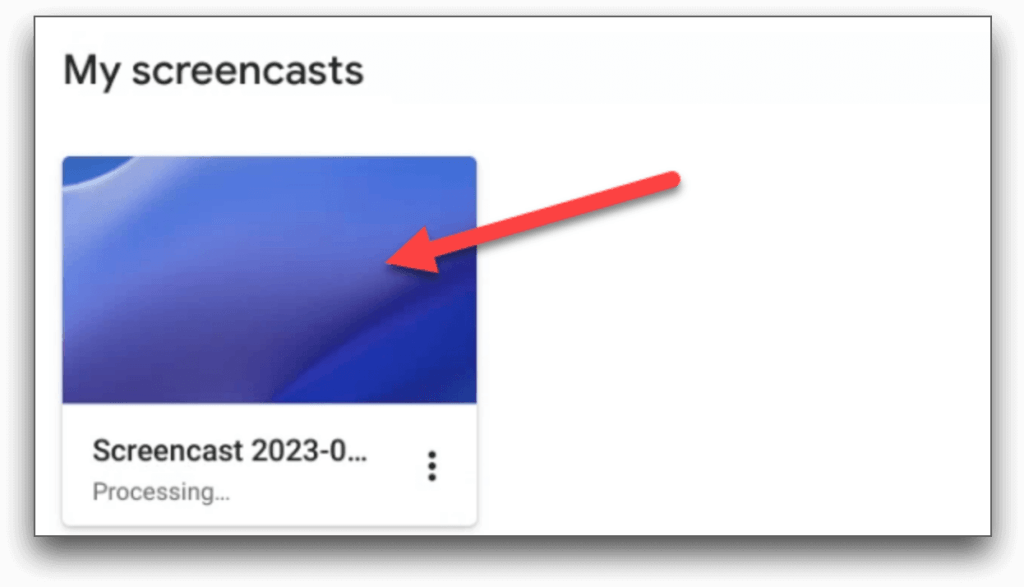
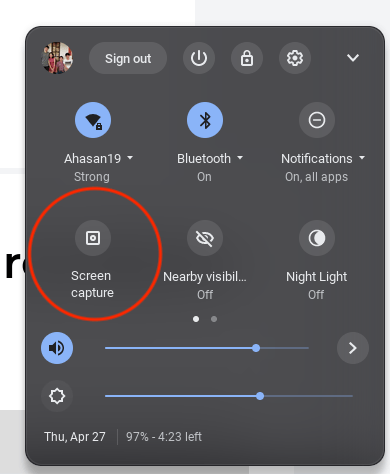
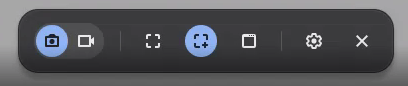
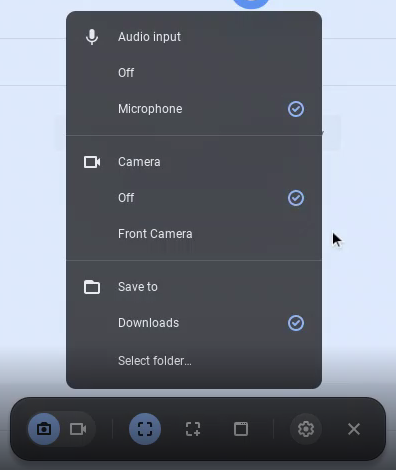
Screen recording with audio on a Chromebook can be a handy tool for tutorials, presentations, or capturing moments. Fortunately, Chrome OS offers built-in functionality for this task. You can easily capture your screen activities and system audio using the right extensions or built-in features. Whether you’re a teacher, content creator, or simply want to share your screen interactions, mastering this skill is invaluable. In this guide, we’ll explore the different methods and steps to screen record on your Chromebook with audio, including native options and powerful third-party tools, ensuring you can effortlessly create engaging and informative content with just a few clicks. Let’s dive in! Chromebooks offer a built-in screen recording feature that allows you to capture your screen without installing additional software. Here’s how to access it using keyboard shortcuts: Your recorded video will be saved automatically in your Downloads folder. Another native option for screen recording on Chromebooks is the Screencast app. Follow these steps to use Screencast: Chromebooks also offer a screen capture tool in OS 89 or newer versions that allows you to take screenshots and record your screen. Here’s how to use it: Your recorded video will be saved in your Downloads folder. Chromebooks have a built-in screen recording function that you can access through the quick steps given below: Screencastify is another excellent tool for educators, professionals, and content creators looking for a comprehensive screen recording solution. It not only allows you to record your screen but also edit and share your videos efficiently. Features include: ScreenApp is another noteworthy addition to the suite of screen recording options available for Chromebook users. Simplifying the process of screen capturing, ScreenApp prides itself on offering a no-download solution for users who are keen on quick, efficient recording sessions without the need for additional software installations. While the native screen recording options on Chromebooks are useful, they may not offer advanced features or editing capabilities. For more versatility and professional-grade recordings, consider using a dedicated screen recording tool. Here are some recommended options: Notta is a feature-rich screen recording tool that works seamlessly on Chromebooks. It offers a user-friendly interface and powerful editing features. With Notta, you can: Vmaker is another excellent screen recording tool for Chromebooks. It provides a smooth recording experience and offers a range of customization options. With Vmaker, you can: Veed is a versatile online screen recording and editing tool that works seamlessly on Chromebooks. It offers a simple, user-friendly interface and powerful video editing capabilities. With Veed, you can: By default, screen recordings made on a Chromebook are automatically stored in the “Downloads†directory. To locate this folder, navigate through the “Files†application accessible from the app drawer, and then select the “Downloads†option listed on the sidebar. Should your preferences dictate a different storage location for these recordings, this can be easily achieved by tweaking the settings to suit your needs. The format for these screen recordings is typically .webm, which, while standard, might not always be the most practical format depending on your usage scenario. For broader compatibility, especially across various devices and applications, converting these files into the MP4 format could be beneficial. For those utilizing the Screencast application for screen recording purposes on a Chromebook, the process diverges slightly. Recordings made with Screencast are not stored locally on your device; instead, they are automatically uploaded to cloud storage. These cloud-stored recordings can be conveniently accessed within the Screencast application, allowing for ease of sharing with others through the distribution of a direct link to the recording. Screen recording on Chromebooks has never been easier or more accessible. With a variety of tools available, users can choose the one that best fits their needs, whether it’s for professional-quality recordings, collaborative projects, or simple video captures. These recommended tools ensure that every Chromebook user can take full advantage of video recording features without compromising on quality, functionality, or budget. Q: Can I record audio from my microphone and system audio simultaneously? A: Yes, most screen recording tools for Chromebooks support recording both microphone input and system audio at the same time. This feature is particularly useful for creating tutorials or presentations where you need to explain what is happening on the screen while also demonstrating audio from the application you are showcasing. Q: Are there any limitations on the length of recordings with these extensions? A: The recording length can vary depending on the specific tool you are using. For instance, Screencastify’s free version limits videos to 5 minutes, which is sufficient for short clips or tutorials. However, some extensions may offer unlimited recording time with their paid versions. It’s advisable to check the specific features of each tool to understand their limitations. Q: Do I need an internet connection to record my screen? A: While most screen recording tools for Chromebooks are browser-based and require an internet connection to access and run the software, some extensions allow you to record offline once they’ve been installed. Nonetheless, an internet connection will likely be required to upload and share your recordings. Q: How can I ensure high-quality video and audio in my recordings? A: To ensure high-quality recordings, use a good-quality microphone and try to record in a quiet environment to minimize background noise. Additionally, adjust the recording settings in your chosen tool to select the highest video quality possible. Some tools also offer the ability to record in HD or even 4K, depending on your subscription plan. Q: Is it possible to edit my recordings within these Chrome extensions? A: Many screen recording extensions offer basic editing features such as trimming, cropping, and adding text annotations directly within the tool. For more advanced editing, you may need to use a separate video editing software. However, extensions like Screencastify and Loom provide a range of editing options that are sufficient for most users’ needs without requiring external software. JIANGSU BEST ENERGY CO.,LTD , https://www.bestsolar-group.comMethods of Screen Recording On Chromebook With Audio


Screencastify
ScreenApp
Notta
Vmaker
Veed
How To Find Your Recordings On Chromebook?
Conclusion
Frequently Asked Questions about Screen Recording with Audio on Chromebooks