MiniGUI and embedded system relationship MiniGUI transplantation process
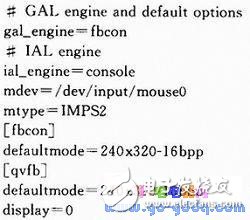
With the rapid development of embedded systems, the demand for Graphic User Interface (GUI) is becoming more and more obvious. MiniGUI is a lightweight graphical user interface support system for real-time embedded systems. It is widely used in communications, medical, industrial control, electronics, set-top boxes, multimedia and other fields with its features of light weight, low resource consumption, high performance and configurability. This article is aimed at this demand, describes how to transplant MiniGUI on the S3C240. MiniGUI is a lightweight graphics system developed by former Tsinghua University teacher Wei Yongming, following the GPL convention. The supported operating systems are not limited to Linux. They can also run on systems such as μCli nux, μC/OS-II, eCos and VxWorks. The verified hardware platforms include Intelx86, ARM (ARM7/AMR9/StrongARM/xScale), Power-PC, MIP S, M68K (DragonBall/ColdFire) and so on. 1.1 Relationship between MiniGUI and embedded system MiniGUI has a good software architecture, and isolates the upper layer of MiniGUI from the underlying operating system through an abstraction layer. As shown in Figure 1, MiniGUI-based applications generally implement their own functions through the ANSIC library and the API provided by MiniGUI itself; the "portable layer" in MiniGUI can hide the details of specific operating systems and underlying hardware, while the upper layer The application does not need to be related to the underlying hardware platform output and input devices. The target platform used in this article is Samsung's highly integrated S3C2440 (ARM920T core with MMC), up to 532 MHz microprocessor, 64MB SDRA M, 64 MBNAND FLASH and 2 MB NOR FLASH storage device. A wide range of peripheral circuits and versatile expansion interfaces including IDE and PCMICA interfaces. The S3C2440 uses a high-performance ARM9 microprocessor for its optimized on-chip performance, which is widely used in video conferencing, building intercom systems, network monitoring, GPS positioning/navigation, medical electronics, multimedia terminal products and other applications. The host host system is redhat Linux 9.0, which requires a full installation. The migration steps are as follows: 3.1 Establish a cross-compilation environment Before the migration, the cross-compilation environment is first established. Simply put, it can generate code that can run on another platform on one platform. The compilation tool is arm-linux-gCC-3.3.2. #tar-xvjf rm-linux-gcc-3.3.2 The default installation path is /usr/LOCal, in order to avoid setting the PATH every time. Add PATH=/usr/local/arm/3.4.1bin:MYMPA TH to the bash_profile file and run the following command: #source. Bash_profile 3.2 Source code preparation From http://. Org/res. Shtml download source code package is as follows: (1) libminigui-1.6.10. Tar. Gz: Source code of the MiniGUI function library. MiniGUI consists of three function libraries, which are libminigui, libmgext and libvcongui. Libminigui is a core function library that provides window management and graphical interface. It also provides a large number of standard controls. libmgext is an extension library of libminigui, which provides some advanced controls and "file open", "color selection" dialogs, etc.; libvcon gui The Linux operating system is provided with a virtual console window available for the application, so that the application of the character interface can be conveniently run in the MiniGUI environment, and the libmgext and libvcongui libraries are already included in the source code package. (2) minigui-res-1.6.10. Tar. Gz: Resources used by MiniGUI, including basic fonts, icons, bitmaps, and mouse cursors. (3) mg-smaples-1.6.10. Tar. Gz: A sample program. 3.3 Compile and install (1) Establish a working directory # mkdir/minigui # cd/minigui (2) Compile and install the MiniGUI library # cd/minigui # tar xzvf libminigui-1.6.10. Tar. gz-C/minigui # cd/minigui/libminigui-1.6.10 #. /configure-prefix=/home/-host=i386-redhat-linux-target=arm-linux--build=arm-linuxCC=arm-linux-gcc--dISA-ble-vbfsu pport The prefix option is used to specify the installation path of the MiniGUI function library. The default installation path is /usr/LOCal. This should be the directory where the system header file directory include library directory lib is located in the cross-compilation environment used. In this example, /home In this way, the MiniGUI function library and header files will also be installed into the lib and include directories respectively. In the subsequent cross-compilation of the MiniGUI application, the MiniGUI header file and function library can be found correctly. among them: The target option is used to specify the target platform, here arm-linux; The host option is used to indicate the type of host, here i386-redhat-linux; The build option specifies the cross-compiled system environment, where arm-linux is used; CC is used to specify the cross compiler used, here arm-linux-gcc. run. After the configure script succeeds, it becomes a custom Make-file file, and then you only need to compile and install it. # make # make install (3) Compile and install the MiniGUI resource file # tar xzvf minigui-res-1.6.10. Tar. gz-C/minigui # cd/minigui/minigui-res-1.6.10 # make install (4) Compile and install the supporting application # tar mg-smaples-1.6.10. Tar. gz-C/minigui # cd/minigui/mg-smaples-1.6.10# make install 3.4 Copy MiniGUI Resources to the Development Board Copy all the libraries in the /home/lib directory (note: -prefix=/home/) to the /lib directory on the development board; copy all files in the /minigui/res directory to the development board /usr/local In the /lib directory, the directory on the development board is in the form /usr/local/lib/minigui/res/......; the MiniGUI under /home/etc. c fg is copied to the /etc directory on the development board; finally, copy the companion application to the development board directory. 3.5 Configuring the Operating Environment of the Development Board (1) Establish ld in the /etc directory. So. Conf file and add the following: /usr/local/lib /lib When the program is running, you can find the corresponding library file. (2) Modify /etc/MiniGUI on the development board. The cfg file, the main modification is the graphics engine and the input engine. This development platform comes with Linux with the VESAFrameBuffer device driver and the initial state is activated. FrameBuffer is a driver interface in the Linux kernel that abstracts the display device into a frame buffer, which the user can see as an image of the display memory. After mapping it to the process address space, you can directly read and write, and the write operation can be immediately reflected on the screen. In this way, MiniGUI can use FrameBuffer as a graphics engine for image display. The LCD display has a pixel of 240x320, so the graphics engine's display mode defaultmode is 240x320-16bpp. And add the usb mouse device file and mouse protocol to the input engine. Modify as follows: Porting the graphical user interface to the embedded device is the trend of embedded system development. This paper describes in detail the process of porting MiniGUI to S3C2440, and finally can run stably on the target platform. This method has a good reference for porting to other target platforms. As a free software with open source code, MiniGUI will have better practical value in the field of embedded graphical user interface, and with the increasingly powerful functions of MiniGUI, the application will become more and more extensive. Pin Header Connector,A-Type Dual Base Pin Header Connector,A-Type Single Base Pin Header Connector,Four Row R/A Pin Header Connector Dongguan Yangyue Metal Technology Co., Ltd , https://www.yyconnector.com
1.2 MiniGUI Architecture From the structural point of view, MiniGUI is hierarchically designed, and the hierarchical structure is shown in Figure 2. At the bottom, GAL and IAL provide the GUI interface and input interface for the MiniGUI on the underlying Linux console or X Window. The middle layer is the core layer of MiniGUI, which includes the various modules that are essential to the window system. The top-level API provides a programming interface to the application design. 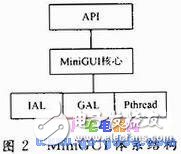
Also in /etc/init. Add a mouse device to the d/rcS script file, as follows:
/bin/ln-s/devr/vc/0/dev/tty0
/bin/ln-s/dev/input/mouse0/dev//mouse